https://github.com/nudibranchrecords/hedron/releases
If you’ve been following Hedron project, you may have noticed things have been quiet for a few years. recently Hedron team announced that the silence is over. Hedron is not just waking up—it's being reborn.
In a new GitHub issue titled "A fresh start - v1.0.0", project member @funwithtriangles announced that work has officially begun on a completely new version of Hedron. This isn't just a patch or an update; it's a total rewrite from the ground up, built to leverage the best of modern development tools and practices.
Led by @funwithtriangles and @cale-bradbury, this new chapter for Hedron is an exciting moment for the project and its community.
Starting from Scratch with a Modern Toolkit
The decision to start over wasn't taken lightly. The goal is to build a more robust, secure, and flexible platform for the future. The team is embracing a powerful new tech stack that promises to elevate Hedron to a new level.
Here’s a look at what’s under the hood:
- TypeScript: By building with TypeScript from the start, the new Hedron will be more scalable, easier to maintain, and less prone to common bugs, providing a more reliable experience for everyone.
- Security-First Electron App: The new desktop application will be built following Electron's latest security recommendations, ensuring a safer environment for users and their data.
- A Modular Monorepo: The project is being structured as a monorepo, which will house several distinct packages. The most exciting part of this is the new
hedron-engine.-
hedron-enginefor Everyone: The core engine will not only power the main desktop app but will also be published as a standalone package. This is huge! It means you'll be able to use the power of Hedron in your own web projects.
-
- Zustand for State Management: Leveraging Zustand, a small, fast, and scalable state-management solution, will keep the application's logic clean and performant.
- A Future with Plugins: The team is exploring a potential plugin system, which would open the door for incredible community contributions and customization down the line.
A Clean Slate for a Fresh Start
To match the fresh start in the codebase, all old issues on the GitHub repository have been closed.
As @funwithtriangles explains, "Because it's a completely fresh project, I've closed all the issues. Some are definitely still relevant, but I'd rather only see issues that people care about recently rather than from years ago."
This move is designed to focus the project's energy on what's relevant to the new architecture. For now, the team encourages everyone to consolidate feedback and discussions into the official announcement thread to keep the conversation centralized and productive.
Get Involved and Help Shape the Future of Hedron
This is more than just an announcement; it's an invitation. The team is actively looking for community members who are excited about this new direction and want to be a part of the journey.
Here’s how you can get involved right now:
- Explore the Code: Dive into the brand new codebase on the
alphabranch on GitHub. (Note: Replace with the actual link) - Join the Conversation: The main hub for all discussion is Issue #444. Say hello, share your thoughts, and connect with the developers. (Note: Replace with the actual link)
- Follow the Progress: Keep an eye on the project's progress by checking out their development board or project tracker. (Note: Add link to project board if available)
The revival of Hedron is a testament to the passion of its developers and the enduring potential of the project. It’s an exciting time to be a part of the community, and we can't wait to see what grows from this brand new seed.
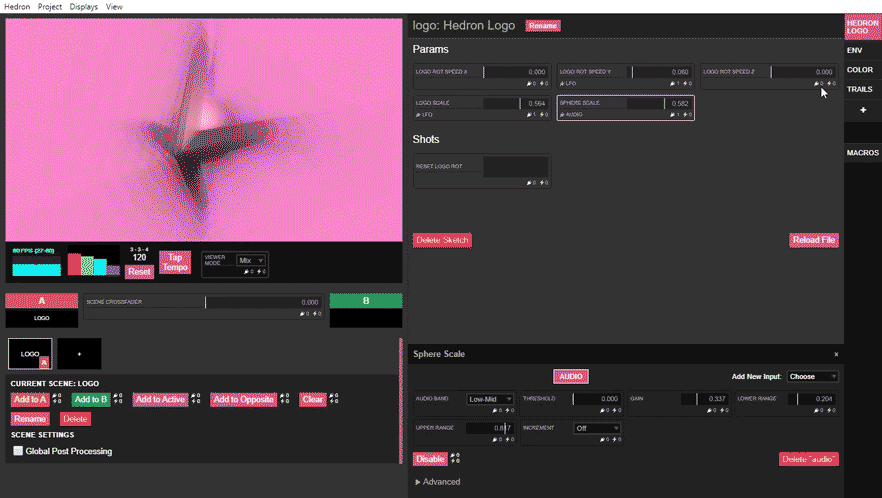
How does Hydra work? Let's break it down.
High-Level Overview: What Does This Code Do?
This HTML file creates a complete, interactive 3D physics simulation that runs in your web browser. It sets up a "room" and fills it with different types of polyhedral objects (like dice). These objects fall, bounce off the walls and each other, and can be manipulated using a control panel.
It achieves this by using three main JavaScript libraries:
- Three.js: A powerful library for creating and displaying 3D graphics in a web browser. It handles everything you see.
- Cannon-es: A lightweight 3D physics engine. It handles all the invisible calculations for gravity, collisions, bouncing, and friction.
- lil-gui: A simple library for creating the interactive control panel with sliders and buttons.
The fundamental concept to understand is that there are two parallel worlds:
- The Visual World (Three.js) that you see on the screen.
- The Physics World (Cannon-es) which is an invisible simulation running in the background.
The code's main job is to keep these two worlds perfectly synchronized in every frame.
Code Breakdown
Let's go through the file from top to bottom.
Part 1: HTML and CSS (<head> section)
<head>
    <meta charset="UTF-8">
    <meta name="viewport" content="width=device-width, initial-scale=1.0">
    <title>Three.js Physics Room Demo</title>
    <style>
        body { margin: 0; overflow: hidden; background-color: #111; }
        canvas { display: block; }
    </style>
</head>
-
<style>: This is basic CSS. It removes the default margin from the page, hides scrollbars, and sets a dark background color. It makes the<canvas>element (where the 3D scene is drawn) fill the entire browser window.
Part 2: JavaScript Setup (<script type="importmap">)
<script type="importmap">
    {
        "imports": {
            "three": "https://unpkg.com/[email protected]/build/three.module.js",
            "three/addons/": "https://unpkg.com/[email protected]/examples/jsm/",
            "cannon-es": "https://unpkg.com/[email protected]/dist/cannon-es.js",
            "lil-gui": "https://unpkg.com/[email protected]/dist/lil-gui.esm.js"
        }
    }
</script>
-
importmap: This is a modern browser feature that makes using libraries easier. It's like a shortcut list. It tells the browser: "When the code saysimport * as THREE from 'three', go to this specific URL to get the Three.js library." This avoids complex build tools for a simple project.
Part 3: The Main JavaScript Logic (<script type="module">)
This is where all the action happens.
Section 3.1: Basic Setup (Three.js)
import * as THREE from 'three';
import { OrbitControls } from 'three/addons/controls/OrbitControls.js';
// ... other imports

// The "Trinity" of Three.js
const scene = new THREE.Scene();
const camera = new THREE.PerspectiveCamera(75, window.innerWidth / window.innerHeight, 0.1, 1000);
const renderer = new THREE.WebGLRenderer({ antialias: true });

// Initial setup
camera.position.set(0, 5, 15);
renderer.setSize(window.innerWidth, window.innerHeight);
renderer.shadowMap.enabled = true;
document.body.appendChild(renderer.domElement);

const controls = new OrbitControls(camera, renderer.domElement);
-
import: Loads all the required libraries using the shortcuts from theimportmap. -
scene: The virtual stage where all objects, lights, and cameras exist. -
camera: The virtual camera—it determines what we see. -
renderer: The engine that takes thesceneandcameraand draws the result onto a<canvas>element. -
controls: Allows you to use your mouse to orbit, pan, and zoom the camera.
Section 3.2: Physics World Setup (Cannon-es)
const world = new CANNON.World();
world.gravity.set(0, -9.82, 0);
- This creates the invisible physics world.
- It sets a standard downward gravity along the Y-axis.
Section 3.3: Creating the Scenery (Room)
function createRoom() {
    // ...
    const createWall = (size, position, rotation) => {
        // Create the invisible physics wall (a static body that doesn't move)
        const wallBody = new CANNON.Body({ mass: 0, /* ... */ });
        world.addBody(wallBody);

        // Create the visible 3D wall that we can see
        const wallMesh = new THREE.Mesh(/* ... */);
        scene.add(wallMesh);
    };
    // ... calls to createWall for floor, ceiling, etc.
}
- This function builds the container. Notice how for each wall, it creates two objects:
- A
CANNON.Body: An invisible, immovable physics object that other objects can collide with. - A
THREE.Mesh: The visible, gray-colored box that you actually see on the screen.
- A
Section 3.4: Creating the Falling Objects
function createObject(type) {
    // 1. Create the VISIBLE 3D object (a Three.js Mesh)
    const mesh = new THREE.Mesh(objectGeometries[type], objectMaterials[type]);
    scene.add(mesh);

    // 2. Create the INVISIBLE physics body
    const body = new CANNON.Body({
        mass: 1, // It has mass, so it's affected by gravity
        shape: cannonShapes[type], // Its collision shape
        material: objectPhysicsMaterial
    });
    world.addBody(body);

    // 3. Link them together for later
    objectsToUpdate.push({ mesh, body });
}
- This is the most important function for understanding the core concept. It does three things:
- Creates a visible object (
mesh) and adds it to thescene. - Creates a corresponding invisible physics object (
body) and adds it to theworld. - Pushes a small object containing both the
meshand thebodyinto anobjectsToUpdatearray. This array is the link between the two worlds.
- Creates a visible object (
Section 3.5: The User Interface (lil-gui)
const gui = new GUI();
const settings = { /* ... */ };

// Example: Create a slider for gravity
physicsFolder.add(settings.physics, 'gravity', -20, 20, 0.1)
    .name('Gravity Y')
    .onChange(v => world.gravity.y = v);
- This section creates the control panel.
-
gui.add()creates a new UI element (like a slider or button). - The
.onChange()function is a callback. It says: "Whenever the user moves this slider, run this function." In this case, it instantly updates the gravity in the physicsworld.
Section 3.6: The Animation Loop (The Engine)
function animate() {
    requestAnimationFrame(animate); // Loop this function forever

    // 1. Advance the Physics World
    world.step(1 / 60, deltaTime, 3);

    // 2. Synchronize the Worlds
    for (const obj of objectsToUpdate) {
        obj.mesh.position.copy(obj.body.position);
        obj.mesh.quaternion.copy(obj.body.quaternion);
    }

    // 3. Render the Visual World
    controls.update();
    renderer.render(scene, camera);
}
animate();
- This is the heart of the application, which runs about 60 times per second.
- Step 1:
world.step(...): This tells the Cannon-es physics engine to calculate everything that has happened in the last fraction of a second (where all the objects moved, what they collided with, etc.). - Step 2: The
forloop: This is the synchronization step. It iterates through ourobjectsToUpdatearray. For each object, it copies the new position and rotation from the invisible physicsbodyto the visible 3Dmesh. This is what makes the objects on the screen move. - Step 3:
renderer.render(...): Finally, after everything has been updated, this tells Three.js to draw the new frame to the screen.


Discussion (3)
I've already rated modv as terrible, and I absolutely can't recommend it. It lacks a native spout, and it's a casual toy, not a professional app for real-time video & VJs with ambitions!
And besides:
I recommend testing things yourself first before publishing them here if you're interested in continuing to launch this as a platform for VJs and pros in the profesional field.
So far, you've created a lot of good content in this direction, and it would be a shame if these qualities were now tarnished by more and more useless content. But I won't document this any further and will simply pick out what's really interesting to me and say nothing more about the rest in the future. It's all too easy to make yourself unpopular if you want to do good, and some recent negative experiences tell me that this isn't really my world or my friends, so I'll generally be more reserved, if at all.
But all the best to you, and thank you so far, bennoH.
Totally disappointing!!
I wanted to try out this new Alpha version 1.0.0 on my Intel i9 Win-10 desktop with RTX 3080, but the installer (SetUp.exe) has a serious bug. I reported it as a feedback issue on the GitHub platform, and the developer said he was sorry and that unfortunately everything is a bit messed up at the moment and that he'll get back to me sometime when it's fixed.
The only positive thing was that the developer responded within 24 hours and was honest. That in itself deserves another chance if they get back to us with a bug fix for that Win10-installer.
I also think the response is a bit embarrassing, given that this version was apparently released as a beta in September 2024 and then as an alpha in December 2024. After another 7 months now after the Alpha release , today I would expect an LTS, but not that even the advertised version doesn't work at all.
Conclusion:
Bad - not recommended so far!
-------------- German orig. text -------
Voll entäuschend!!
Ich wolte diese neue Alpha Version 1.0.0 ausprobieren auf meinem intel i9 Win-10 desktop mit rtx3080 aber fehlanzeige der Instahler (SetUp.exe) hat einen harten Bug ich gab dass als Feedback-Issue suf der GitHub platform an und der Entwickler meinte das es Ihm leid tuht und leider alkes etwas drunter und drüber geht aktuel und er irgendwan wenn es repariert ist sich zurückmeldet.
Ich finde auch da offenbar im September 24 diese Version als beta erschien und per Dezember 24 dan als Alpha die Antwort etwas beschämend ist. Nach weiteren 7 Monaten nach Alphaveröffentlichung würde ichcan an sich eine LTS erwarten aber nicht dass nicht einmal das angeprisene im geringsten funktioniert.
Das einzig positive war das sich der entwickler innert 24h zurückgemeldet hat und ehrlich war. Was an sich dan soäter doch noch eine Chance verdient wennn der sich mit einer Bugbeseitigung meldet.
Fazit:
Schlecht - nicht empfehlenswert bis jetzt!
Try modv in the mean time ..it has threejs support too.