I saw that there was an post on VJun.io here about the Spout input and I thought I would share my experience and thoughts on how to get this setup and it's practical application. This article is intended to be a tutorial but also a real use scenario. I make paper craft for my projection mapping and was looking for a way to create a sort of fake lighting. In my mind I love the idea of creating drama and visual interest in shapes by changing the color and direction that lighting is addressing the 3d space.
Here is a video to give a brief explanation of what I am referring to :
Spout add-on installation for blender.
Once you have downloaded the addon from the link above locate your add-ons folder for blender and move the zip file you have downloaded to this folder. Open Blender, go to Menu, Preferences, Add-ons, do a search for and then enable the "TextureSharing" add-on. You may see a button to install the SpoutGL or syphon-python library via pip if you do install it. To get NDI to work, locate the downloaded wheel file for your system architecture you may need to download the the wheel file so do a google search for "NDI Wheel file". once you have located the NDI Wheel file press the button to install the NDI library. When the library is installed, disable and reenable the addon. Finally, save and close preferences.
Texture sharing - Spout add-on setup.
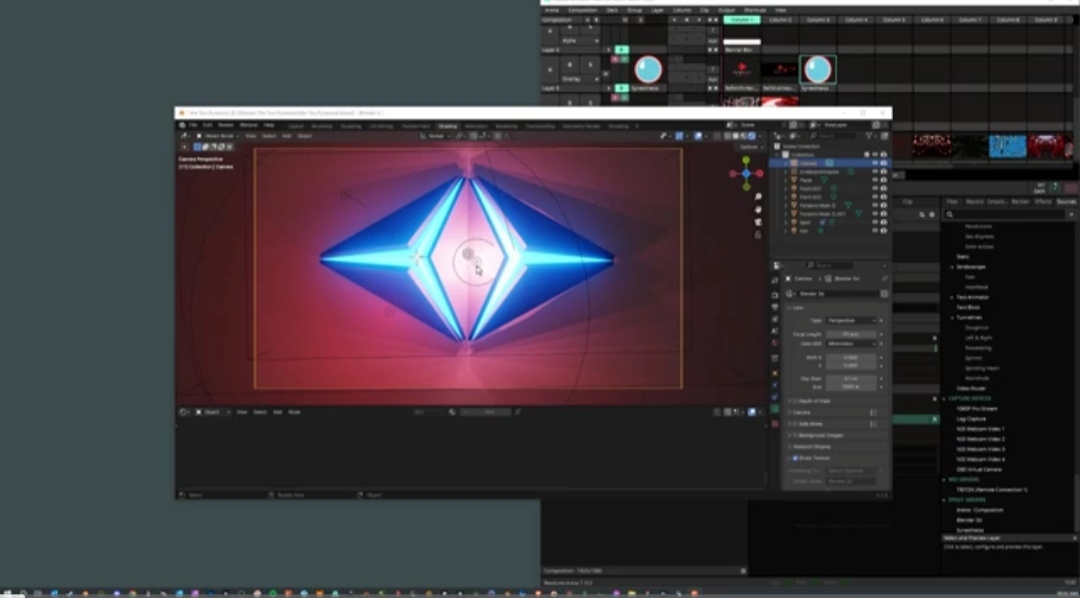
In blender, select your camera in your scene. In the properties panel, navigate to the "Camera" tab and hit the arrow to roll out the settings for the "Share Texture" options. Here you will find the settings for the Spout connection. Your settings may be different from mine but I set my Capture width to 1270 and Height to 720.(As a side note, I also change the output to reflect this size as well under the "Output" tab, "Format" roll down and resolution settings. No use keeping the 1920 X 1080 here if the Spout resolution is not outputting that.) I left the shading, scene, and layer to the defaults. I made sure that, "Apply color management" and "Flip outgoing texture" have been checked. Finally I gave my "Sender name" a better name(Blender Camera) to me so I could identify it in Resolume better.
Once all my settings are configured I check the checkbox next to "Share Texture" and I am now ready to move on to Resolume.
Resolume - Setting up the Spout connection.
In Resolume to add the Spout connection you made for Blender is simple. Just look for your "Sources" Tab scroll all the way down to the bottom to "Spout Servers" or "NDI servers" (if you used the NDI connection instead) and select the Blender Spout output that you made in blender and drag it to one of the cells in your scene. You should now see your Blender camera in Resolume.
Some notes about the Blender setup
First off, obviously I am using the Evee rendering engine. Make sure in Blender that the Render tab, it set to Evee. There are a few options I will suggest here to make the spout output a little smoother. Under the sampling options, make sure the "Renderer" and the "Viewport" are at a lower number. I set mine to 16 on the Render and 8 on my Viewport. You don't need this to be so low however the lower the number the smoother your computer will run the Realtime spout output. I turn off my ambient occlusion but make sure my bloom is on. The only other setting I modify is the "Simplify options". These settings can also help my performance.
On the Layout tab (the Main window) is the default screen that the camera is rendering from, so your viewport shading will need to be changed to "Rendered" to get the quality you are looking for. In My case I uncheck the "Veiwport overlays" button and the "show Gizmo's" button and then make all of my adjustments to the scene in the Shading Tab. That way I can see all of the options for "Viewport Overlays" and "Show Gizmo's" but the spout output for Resolume will not display all those extras.
One thing I'd like to note here, DO NOT hit undo in your
Blender file. This will/can lock up your spout output and you will need to restart your Spout output and possibly your programs.
I plan on writing my experiences on the Midi controller Add-on for blender called "jpfep" however, I believe that need to be it's own article. There is a great deal there to cover, but it's important to me that I mention this add-on because it works very well with this setup.
How are you feeling about these articles? Let me know in the comments below. - Jacob Mesick


Discussion (0)