
The Good the Bad the Funky
Creating a nDVme [Non-Destructive-VJ-Mix-Edit] music video using Resolume & Ableton.
As a child, on the occasional Saturday night I would often head to the loungeroom floor with a swath of pillows, a big bag of salt and vinegar chips and a bottle of soft drink to watch a Spaghetti Western on TV. The classic that I refer to here is The Good the Bad and the Ugly.
A cult film that defined the Spaghetti Western genre directed by the genius Sergio Leone, accompanied by an incredible music score composed by the master Ennio Morricone. And of course who can forget, the actors that made it such a cult classic, Clint Eastwood, Eli Wallach and Lee Van Cleef, with their exciting gun slinging, viscerally gritty and hyper-realistic penetrating gazing performances.
When music producer Lil Rossco sent me a link to his tGtBtFunky remix of the original Title track for The Good the Bad and the Ugly, I immediately jumped at the opportunity to offer to create a homage music video for this much loved childhood classic.
Being inspired by the production of the MELTDOWN 1 & 2 videos, created by Director Jeff Jaffers for Third Eye, I have been experimenting for many years, since the mid 90's at least, with making short-form and long-form videos using non-traditional editing methods. Up until this point I had used OctaMED Mod tracker on a Commodore Amiga.
Then after discovering Ableton, I was excited to deep-dive into how I could use audio and midi to drive an audio reactive and midi triggered video using a DAW combined with VJ software, to create an ‘edit’ process (ie nDVme) where I could continuously play on loop, whilst jamming and tweaking in realtime – a process similar to and also inspired by the music production process.
Like Private Investigators are frustrated wanna be Cops, one could say that VJ's might be frustrated wanna be Music Producers :0
Here is the nDVme process I used to create tGtBtFunky:
Firstly, I ripped an online low-rez full-length cinematic version of the film. My apologies Sergio et al, I can't afford the licensing rates for such an epic film :(
I imported it into Adobe Premiere Pro, where I began cutting up the movie into small loop-able moments, which there were many, approx. 170 clips, even after being highly critical and very selective. Tip my hat to Sergio’s cinematography, the use of close-ups made for compelling cinema.
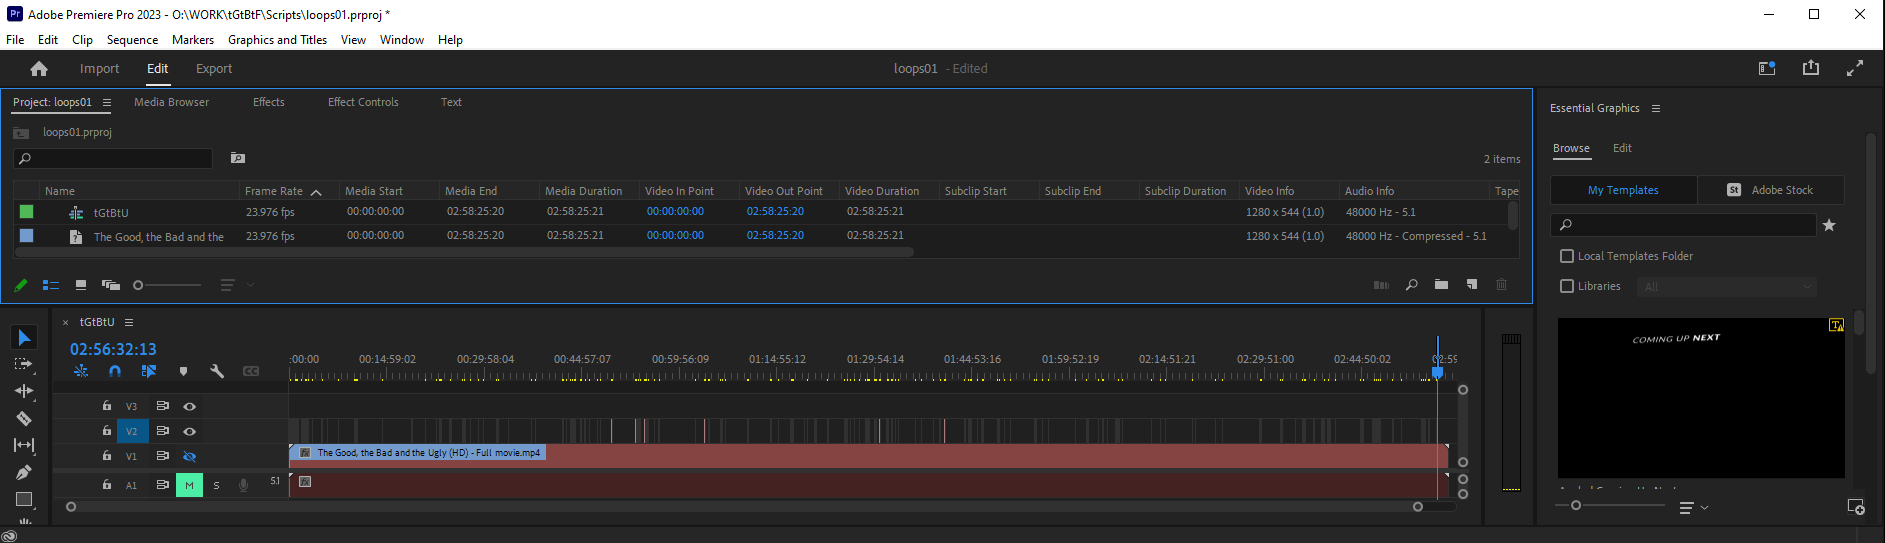
All clips were then exported at their downloaded native 1280x544pxl low-resolution using a DXV3 Codec.
I then took the films animated Titles sequence and manipulated the Titles - replaced Ugly with Funky.
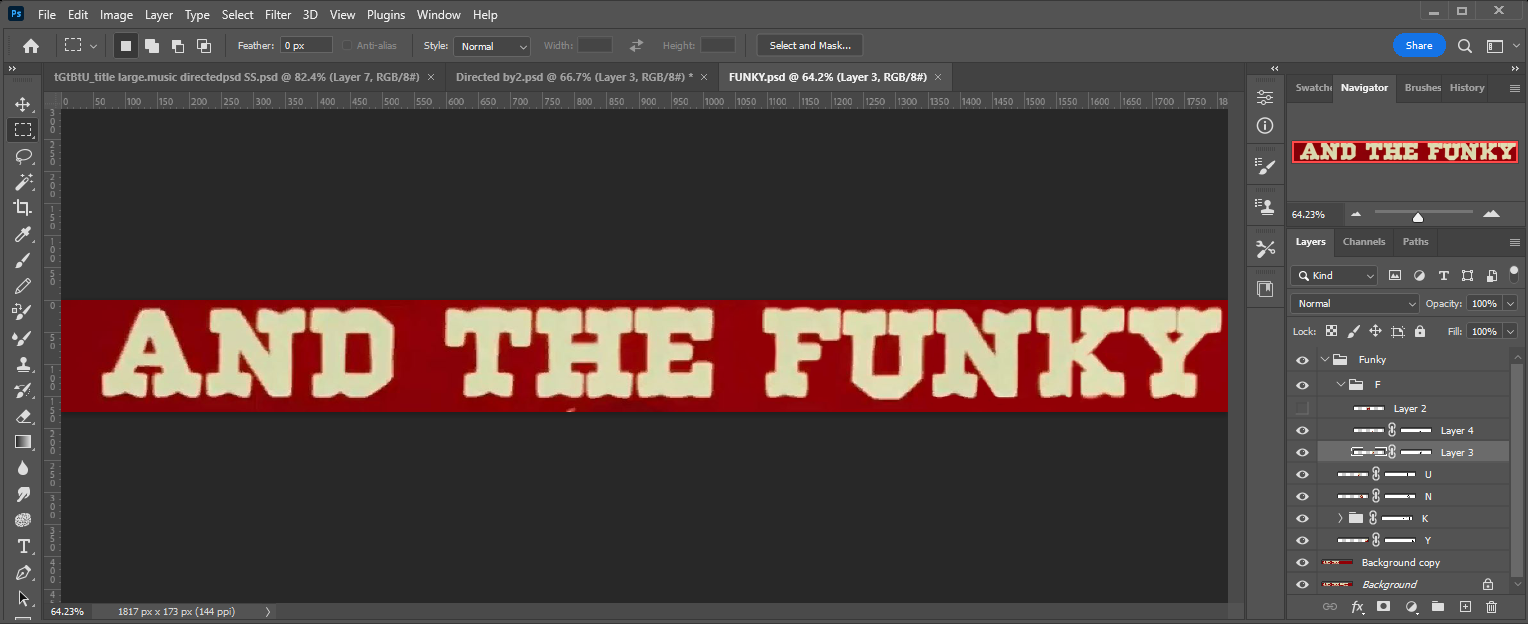
Also replaced credit frame characters for 'Music by' & 'Directed by' using a downloaded Western Font and cut/paste/cloning in Adobe Photoshop to recreate some characters.

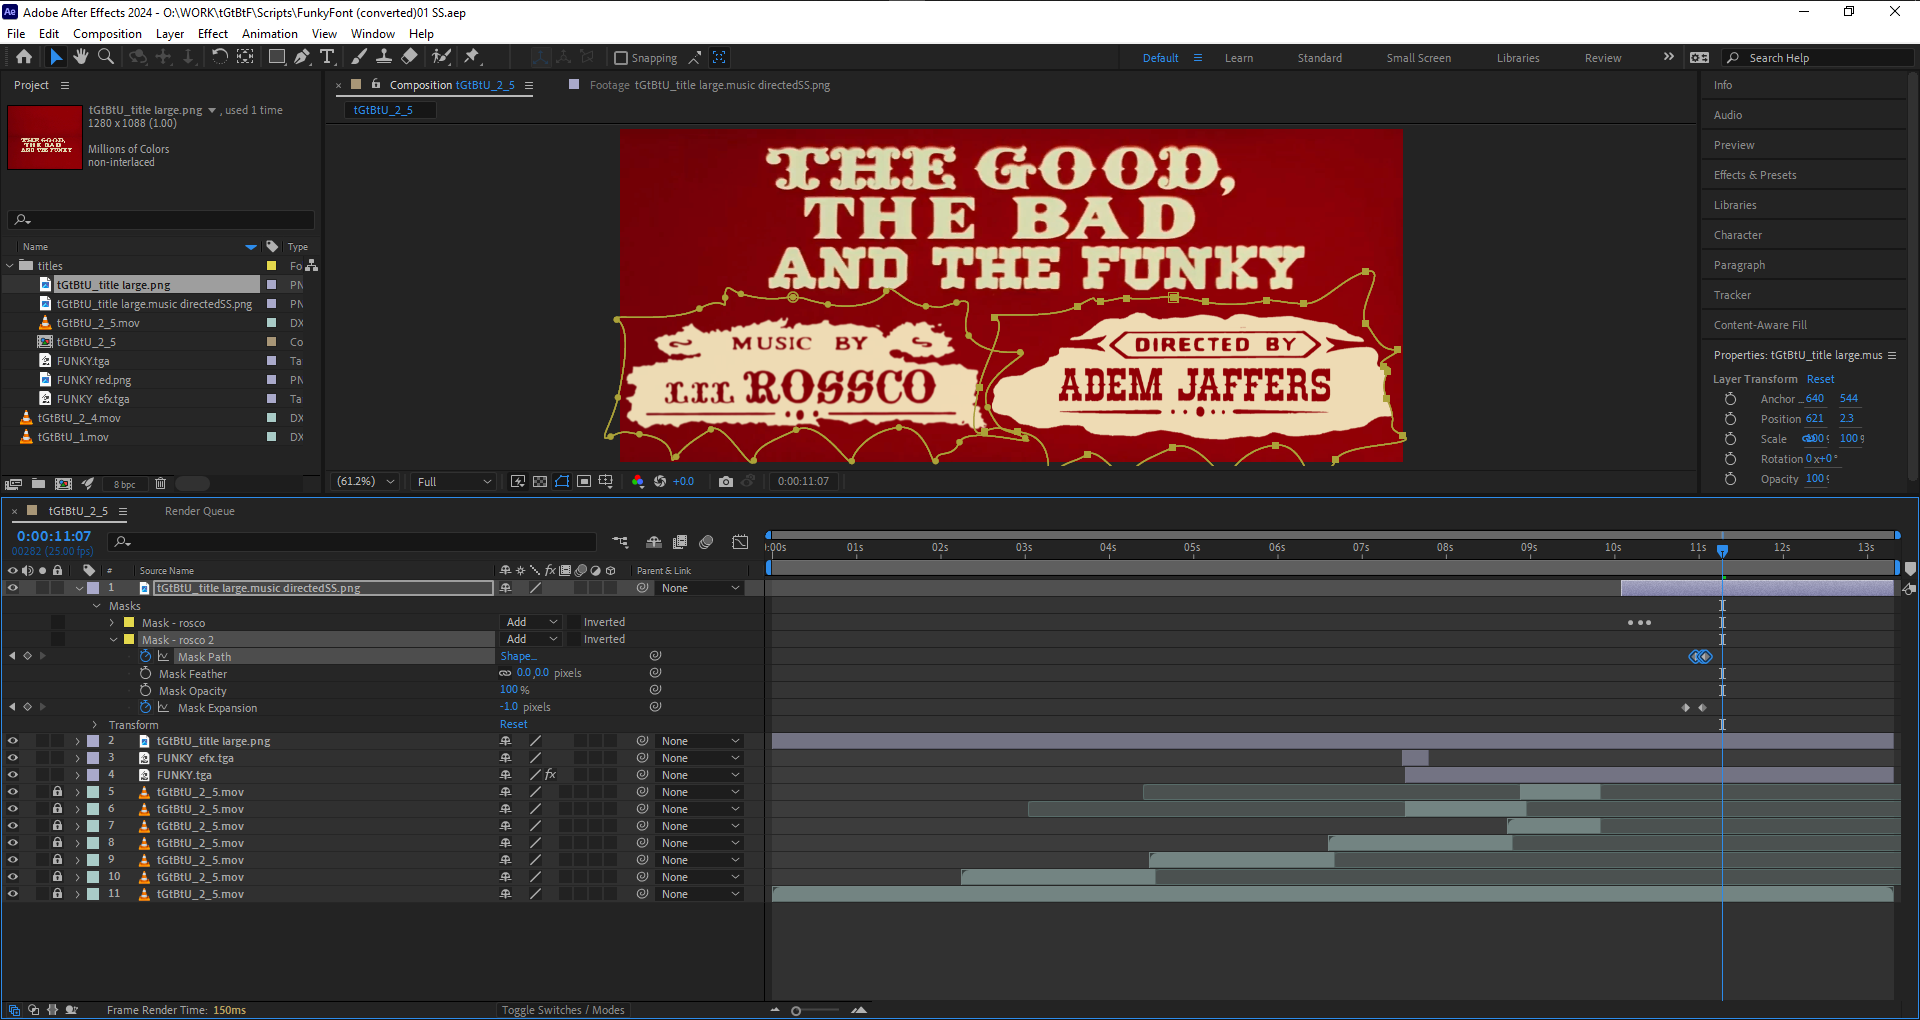
Then re-inserted and animated frame components to match back into original Titles using Adobe After Effects.
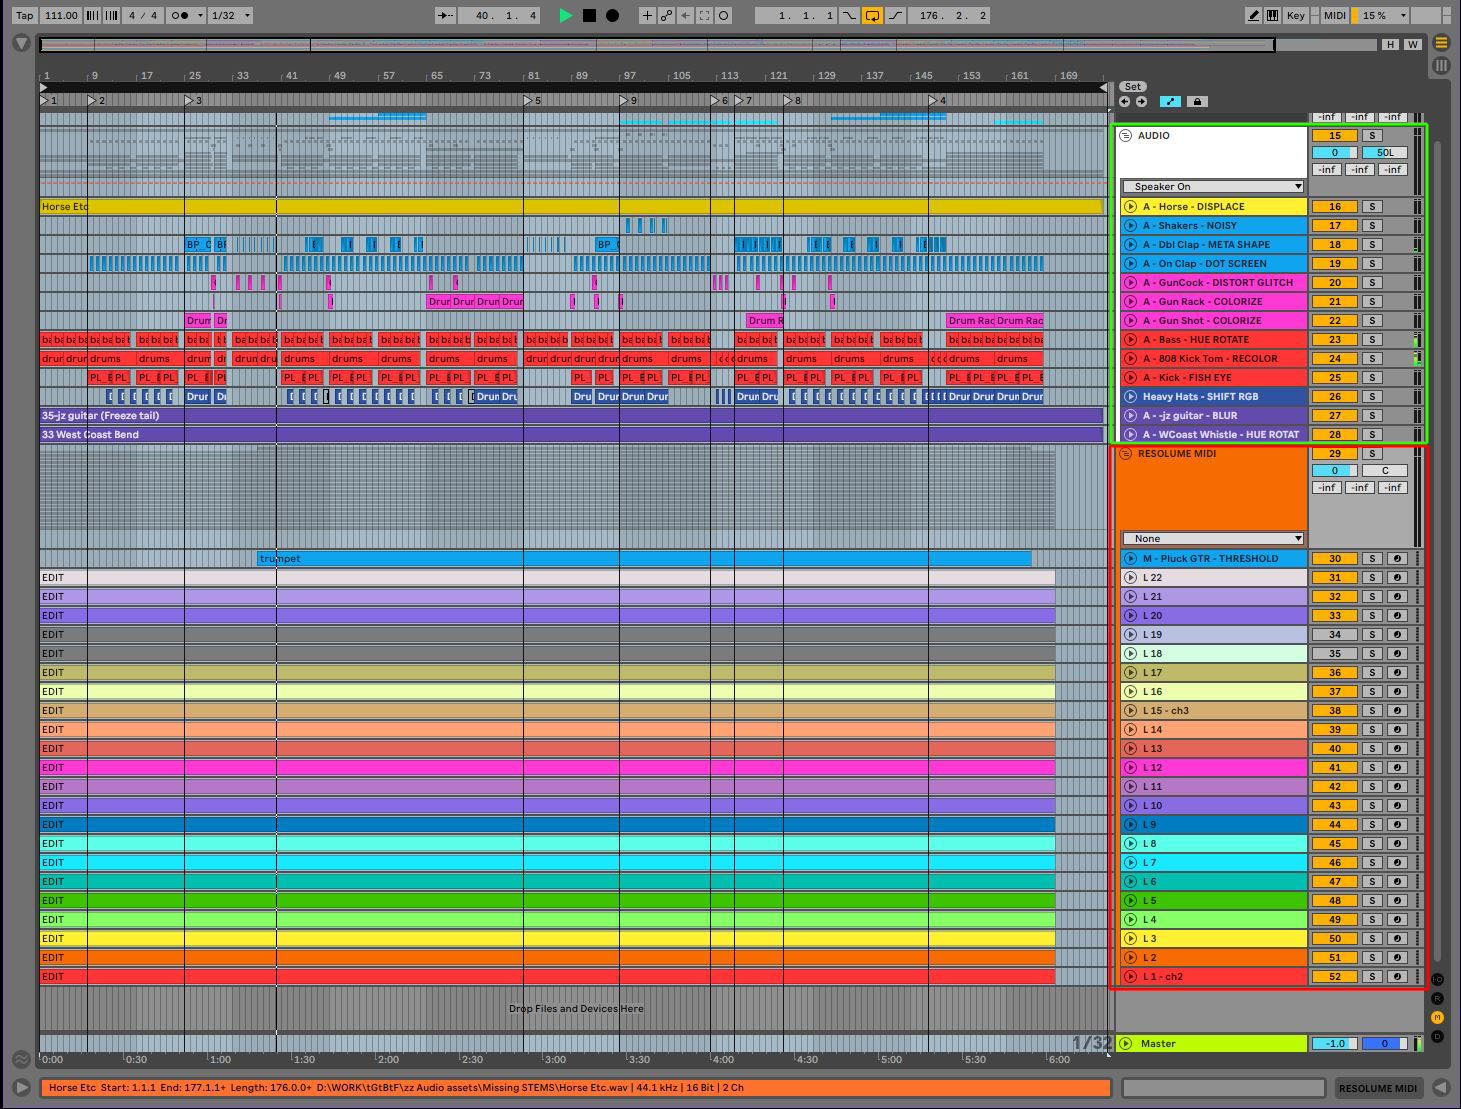
All DXV clips were then imported to a Resolume V7 1280x544pxl Comp at 25fps and laid out in an 8 column, 22 layer formation (see green outline below).
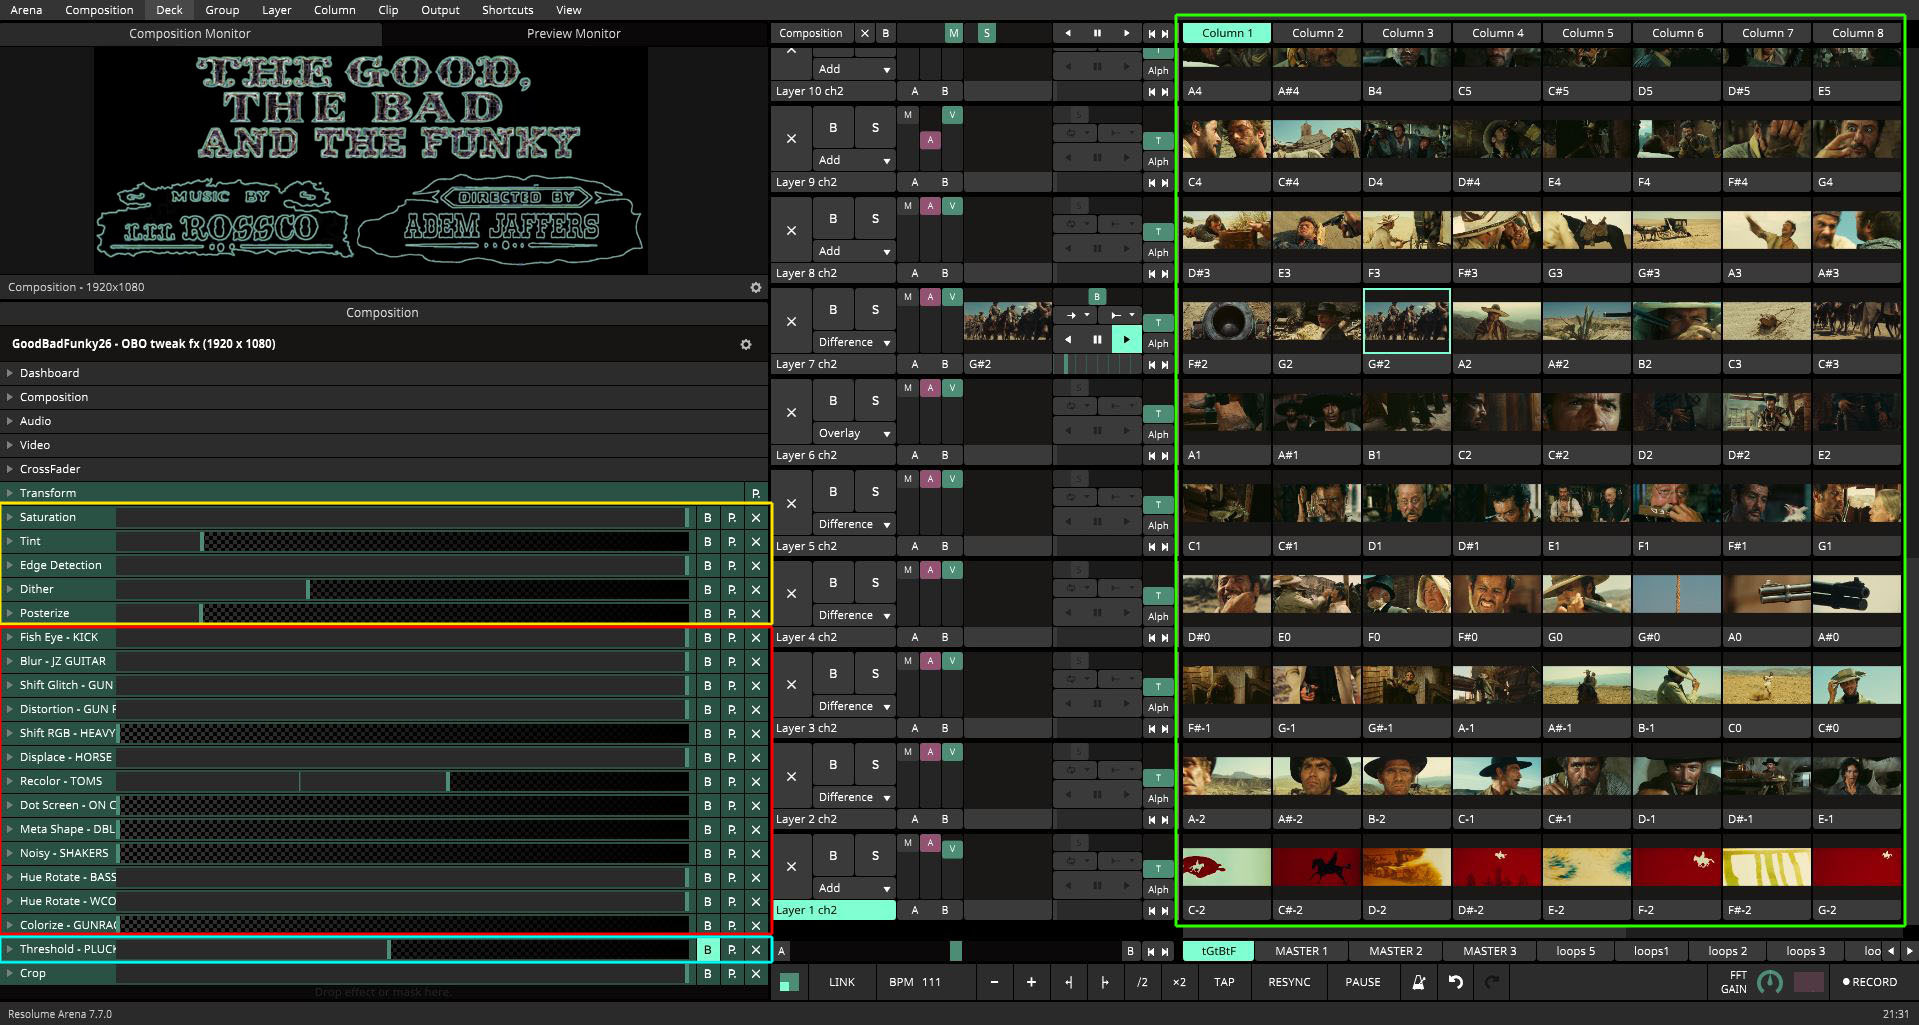
All clips were set to BPM playback, timelines trimmed to their optimal aesthetic key in/out moments and playback speeds set.
Next task was to begin the overall treatment (look-feel) by experimenting with various base effects until a desired look was achieved (see yellow outline above).
In the next stage I began setting up the effects that were to be audio & midi driven (see red outline above). Some effects are only visible when there are certain pixel value conditions met. As the sampled film clips were shot under various lighting conditions, I added effects to individual clips to achieve a more consistent and balanced level when Comp effects were applied (triggered).
Lil Rossco supplied a very detailed, color-coded and appropriately track named Ableton project with all the audio wav and midi clip stems used to create his Funky remix. Gotta love a neat well organised project!
Once the project was opened stems were re-arranged into groups of 'audio or midi', then colour coded to suit my working methodology (see green outline below). A couple audio and several midi tracks were discarded for various reasons, namely their prominence in remix and more than 13 tracks could get messy to manage.
The MP3 version of the remix was also added into project. Note that the version used in video clip is mixed differently to the Soundcloud release.
In creating the audio remix, in Lil Rossco’s own words:
The idea for the remix concept arose when I heard the original track and thought "that would sound sick as a westcoast style synth", so I dropped the midi in Ableton and... here we are.
There weren’t many midi parts so I kept the ones that worked and reassigned the samples accordingly. I used a Kontakt pack called Spaghetti Western which replicated many authentic cowboyesque sounds. Added a sprinkle of foley/fx, a hefty dash of kickin' bass and mix thoroughly.
Yeehaw!!
Plugins etc: Ableton, Kontakt (Western Sounds), Massive (Westcoast Synth) & Drum Rack – Percussion.
Next stage was to manage the audio for reactive input to Resolume and simultaneous monitoring in headphones.
Because Ableton was sending out a single L/R stereo output, and Resolume could only take a stereo input, which becomes mono when both channels used as an FFT trigger; a simple but incredibly effective methodology was employed.
A method that began during a music video for Shinjiku Thief's ACMI project Amalgam, where upon request, Darren Ver Hagen EQ’d tracks to crudely separate the frequency bands distinctly for 5 instruments, to enable the selective envelopes when using Resolume’s FFT triggering on effects parameters for specific tracks only. To avoid all the effects parameters to jump around continuously to a summed audio track like a 1980's disco light.
With Lil Rossco’s sage advice, FabFilter Pro-Q^3 was used specifically for its ‘brickwall’ EQ ability (see red outline below).
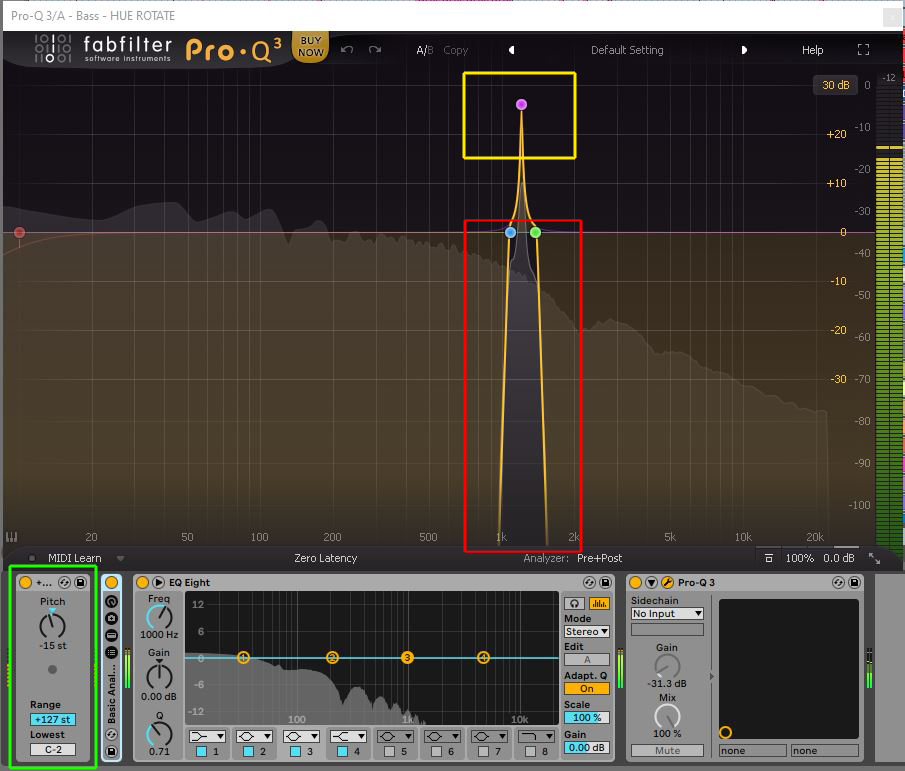
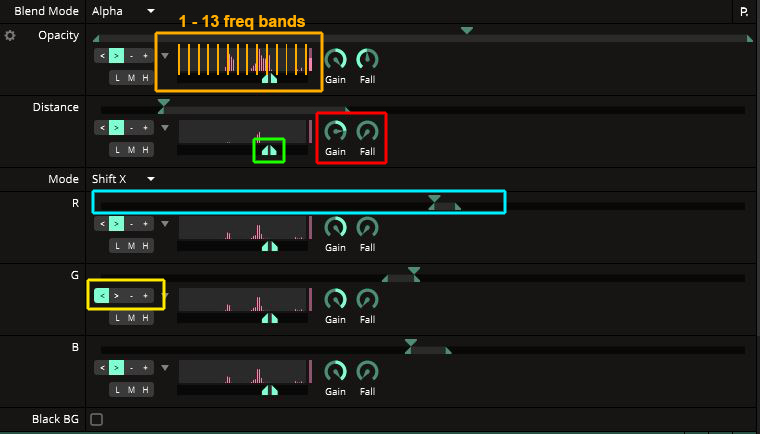
Where only the desired section of the tracks full frequency range could be homed in on, flat-lining the rest. Though before this frequency range was brickwalled, pitch control was used to move the area of wave form interest to a desired frequency band location first – then brickwalling used to clamp band. This simple method enabled 13 selected audio stems to be arranged so that they don’t overlap (see orange outline below).
Given the bands of interest were pushed and pulled around, the summed total of the audio out sounded nothing like the remix. So, I had to pan all audio reactive stems to right channel and the mp3 remix to the left channel.
The right channel was selected in Resolume FFT for triggering and the remix was monitored in the left headphone channel. That way I could listen to the remix and the reactive tracks simultaneously or separately.
From this point forward the fine art of audio-reactivity became a matter of tweaking the various FFT frequency band value ranges in Resolume (see green outline above), various combinations of effect parameter value ranges (see blue outline above), Gain and Fall levels (see red above outline), effects parameter playback directions (see yellow outline above)
And finally whatever other effects parameters I wanted reactive, whilst simultaneously tweaking the FabFilter gain (see yellow outline above) to achieve an optimal overall desired and balanced triggered effect for each stem & effect combination.
The idea was to have an overall striking look to clip. Then to have some effects operate very subtly - to not only be in sync, but to fit the feel of the sound, and to also have some effects be very pronounced.
Resolume effects were named with their Ableton audio track counterpart and visa-versa for ease of tracking and debugging relationships (see red outlines above).
Once all the effects were roughed by using a couple of selected clips on loop. The next task was creating the nDVme, by firstly adding 22 midi clips in Ableton (see red outline above).
One midi track per Resolume clip Layer, named accordingly, for tracking and debugging simplicity. Within each midi clip 8 notes were inserted starting at channel-2, note-C2, working up the scale, switching to channel-3 when notes ran out on channel-2.
Then each midi note was mapped to each of the 8 Resolume clips along a single layer, then the clip name changed to reflect the midi note mapped to it – again for tracking and debugging simplicity. Only one of Lil Rossco’s original midi tracks were used to drive an effects on/off Blocking.
Now that the stage was set. From this point forward it was only a matter dropping midi notes along the automation timeline to correspond with various stem changes over time, using the wave forms as visual guides (eg Claps) to drop midi note triggers, or by just listening to the feeling of the remix to trigger clip changes and create clip loops.
This whole nDVme performance part of the process took about a full day of tweaking overall, continually looping the entire remix, adding, deleting, moving notes, tweaking EQ settings and effects parameters over and over until the desired final montage homage was achieved. The pre production to about 3 days overall.
When to cease tweaking is the dark-side of the VJ creation process. Many a VJ have never come back out of the VJ hole, so be warned! :)
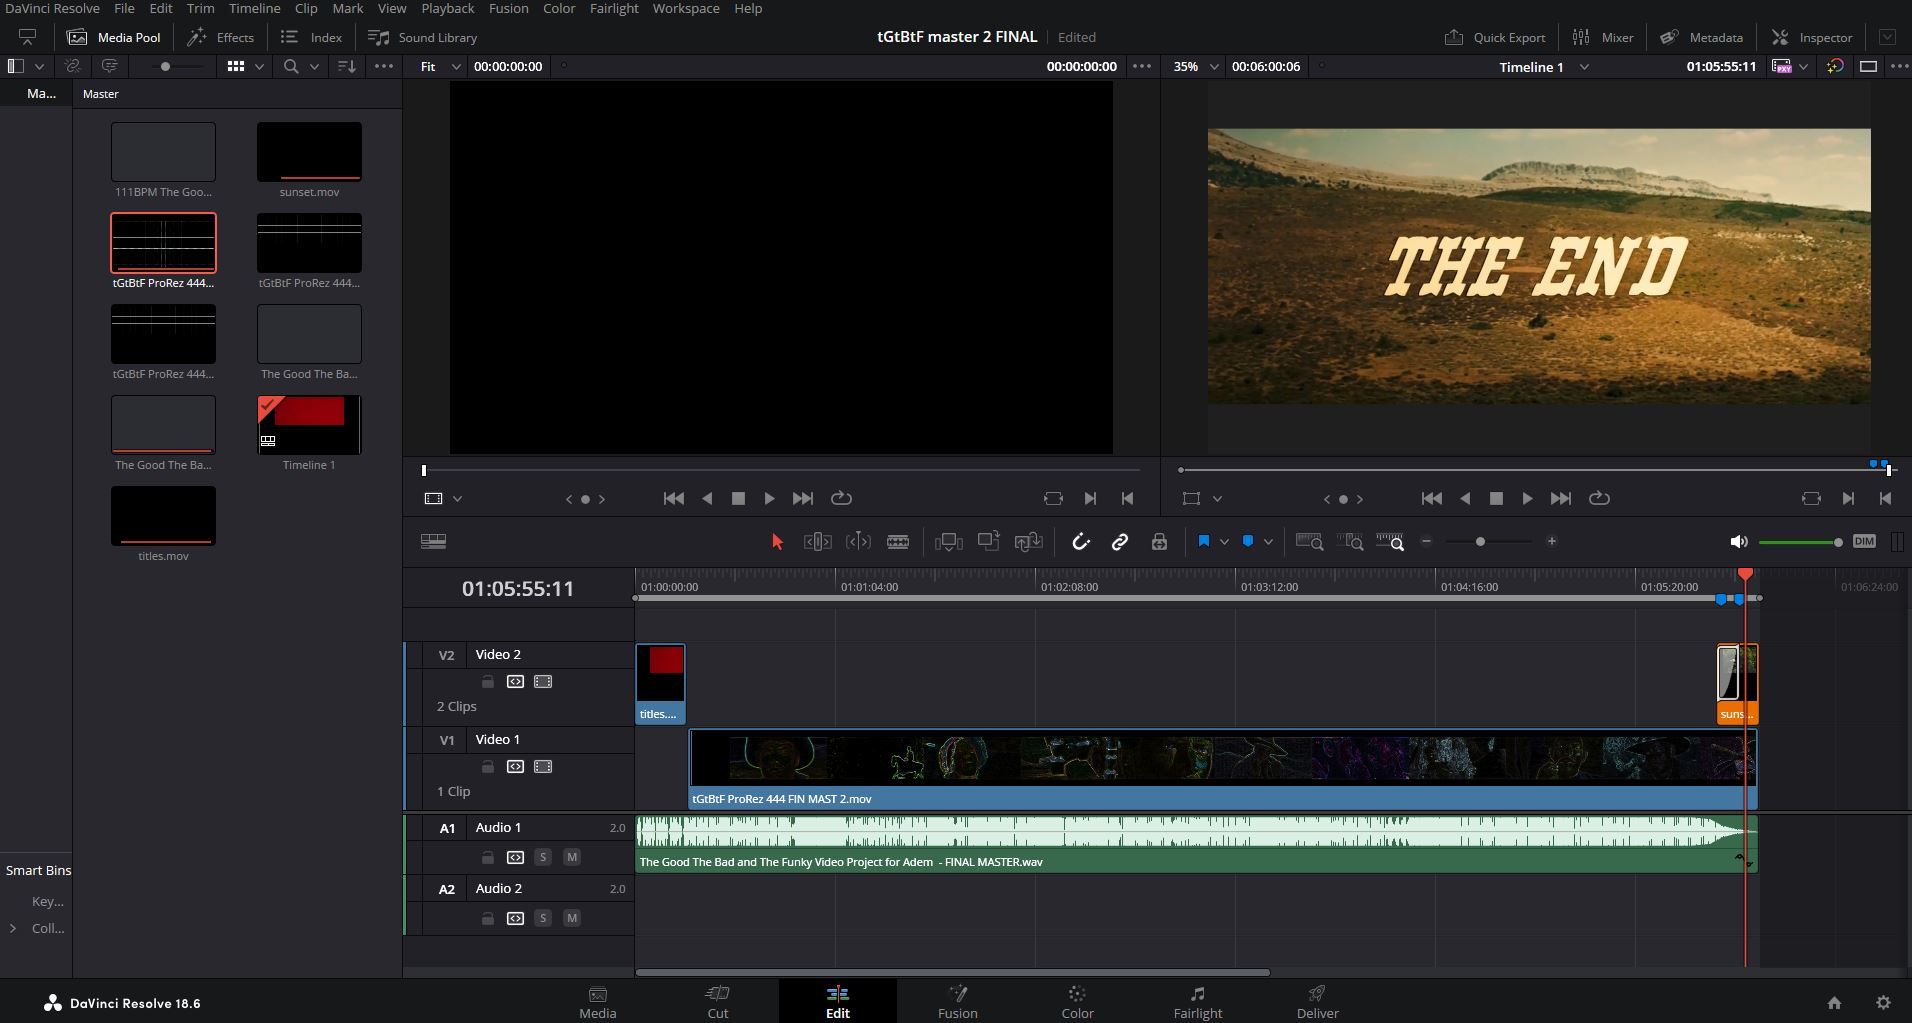
I then reset the Resolume Comp to 1920x1080p, cropped slightly to remove some effects frame edge spill, centered and scaled the 1280x540 comp to fit. The final video (only) playback was recorded in Resolume using a Pro-Rez 444 codec. The resulting MOV was taken into Davinci Resolve/Fusion to trim top and tail excess recorded footage, added start/end fades to reveal original untreated footage, striped the clip with the original 44kHz WAV remix, then mastered hirez & lorez outputs.
That's it for this iteration. I have many ideas on how to improve this nDVme process. Just need another inspiring track to do it with. Until then, I hope you enjoy the tGtBtFunky video as much as it was to make!
This article is reposted from my blog at AdemJaffers.Art
PS. In case your wondering about how to pronounce nDVme, it's 'en dee vee mee'.


Discussion (1)
awesome insight many thanks 🙏🙏🙏🙏